
In college, one of my illustration professors gave some advice that stuck with me:
“You can do anything with a really good drawing.”
That could not be more true! With an awesome drawing you could make a fantastic painting, a well-designed screen print, thorough plans for an amazing sculpture… and the list goes on and on. There are even more possibilities to build upon a beautiful drawing after scanning it and making playful adjustments with digital tools.
Coloring with Photoshop “Channels”
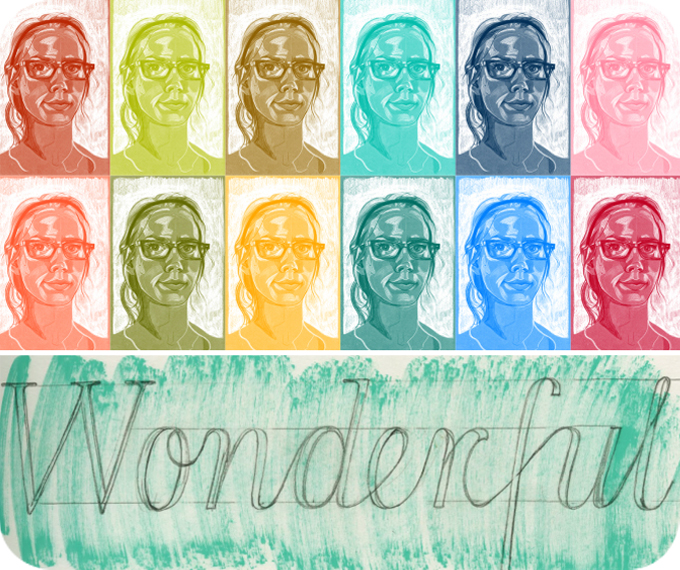
I tend to work in black and white first, then scan my drawings and open them in Photoshop to experiment with color. You can use “channels” in Photoshop to fill any scanned black and white drawing with another color of your choice. The repeated self portrait at the top of this article shows what that can look like. Any black areas of a drawing are filled with a new color which you select, and then all the gradients moving closer to white use a lighter version of that same color. Channels are transparent, so you can also digitally color beneath them without covering up your drawing. The above animation shows how I experiment with digital coloring beneath transparent channels. I love that this technique preserves the textures I make on paper. Most of my digitally finished illustrations are made up of many drawing and texture channels with digital painting underneath. For the illustration below, I made and filled about 15 channels with various colors, then colored the layers beneath them.
“Beautiful Worlds” by Adriana Vawdrey (me) — this illustration is for sale in my print shop as a half or full image.
How To Make Channels
If you would like to learn all the steps for making channels out of your drawing, check out the video below. You can get a very quick demo of how colors are layered by watching from 4:10 – 5:20.
This tool has become so important to my illustration process that I don’t know what I’d do without it. If you are interested in learning more basic tricks on Photoshop, I highly recommend testing it out! You’re likely to get as hooked as I am on these color experiments.
Have fun!

Thank you, this is great. One question: once you have created a layer from the channel, is there any reason to keep the channel?
LikeLiked by 1 person
Hi Holly! Thanks for your question. There is no reason you’d need to keep the channel unless you plan to experiment with it later within in the same file. Once you’ve put it onto a layer, the layer won’t disappear if you delete the channel. I usually delete unwanted layers and channels once I feel solid about my color choices.
Have fun!
LikeLike
Giiirl! I love you and this so much! Such a useful tutorial. I wanted to pick your brain about your scanning process. What size of drawing, scanning resolution, scanner type and any tricks you use? Do you scan your own textures? You are an amazing teacher, mama and friend!!
LikeLiked by 1 person
Danae! You made my day with such a nice comment. Thank you! I love all the awesome drawings you’re posting and the cute stories about mom life. You’re amazing, and I admire your tenacity! Artist moms… we gotta keep chugging along! Okay, here are a few things I do with scanning:
Size of original drawing: usually 8″ x 10″ or 9 x 12″.
If I am doing something that needs to be printed at a really big scale, I work on bigger paper. For the surfboard project I did this summer, each of those drawings was 30″ tall. I photographed them with my digital camera just to see if the resolution would work on the file size (about 70″ tall). When I pasted the photos into photoshop and then zoomed way in, the quality of the drawings worked just fine. I had to size up the photos a little, but they never became pixellated. On super small drawings (like mini pocket sketchbooks), I usually scan, but sometimes I’m lazy and just take a good picture with my phone, haha. As long as the image file has good quality inside your photoshop file size, it doesn’t matter too much how you get that image.
Scanner: When I scan I just use a basic HP printer/scanner combo. If my drawing is just a little too big to fit on the scanner, I scan it in two halves and put them together in photoshop. If it’s huge, I use my camera and try to take a straight photo in indirect sunlight.
Resolution: I always scan at, and make my photoshop file size 300 dpi. It’s a high resolution, so that makes it easy for me to size up a little without losing a lot of quality. 600 dpi can make files too huge and photoshop runs slower, so I just stick with 300. I haven’t experimented with scanning small drawings at 600 dpi and trying to blow them up. Personally I like to just work a little bigger for things that need to be printed big because my drawings look more crisp and detailed.
Textures: Yes, I do scan my own textures :). In the past, I overlayed tons of textures separate from my drawings, partially because I was drawing everything in pieces and assembling them in photoshop. That was a good experiment and I learned a lot, but it took up SO MUCH TIME. So now I force myself to finish the entire composition on one sheet of paper, with hand made texture (either graphite, charcoal, or gouache), and then scan it. I still make and overlay separate textures when I feel like the original drawing could benefit from it.
I hope that info helps! Feel free to ask questions any time! I hope you’ve had a lovely weekend :).
LikeLike
[…] When I want to add color to a black and white drawing in Photoshop, I always do it by layering different shapes of color above and beneath the drawing. Unless you have used Photoshop, that might sound really confusing. Imagine a black photo printed on a sheet of transparent plastic. If you lay that transparent photo on top of a colored piece of paper, you will see the color come through. I make my drawings transparent using the “channels” function in Photoshop. If you want a really simple example of what that looks like, and a demo on how to do it, check out “My Absolute Favorite Coloring Trick in Photoshop”. […]
LikeLike